
Table of Contents
If baking feels like climbing a culinary Everest, this is your rope and harness. A no-stress, no-dread, cookie-crust ice cream sandwich that practically makes itself—and tastes like a dream wrapped in a crunchy, creamy hug.
Why This Recipe Is Perfect for Baking Beginners (and the Curious)
If the thought of turning on the oven makes you hesitate, you’re not alone. Baking can feel intimidating—precise temperatures, timing, delicate textures. But not every dessert has to be a test of patience and precision. This ice cream sandwich recipe from scratch proves you can create something utterly luscious with minimal complexity and maximum flavor.
The genius here is simple: a crust that comes together with just a handful of ingredients, a creamy filling that’s lightly sweet and incredibly forgiving, and a top layer that seals in all that chilly bliss. The process relies on three main components—cookie crumbs transformed into a sandy crust, a whipped dreamy filling that folds in cookie crumbs for texture, and a second layer of crust to lock it all in—plus generous chilling times that do the heavy lifting for you. You’ll be surprised how easy it is to achieve a professional-looking dessert without turning your kitchen into a science lab.
As a bonus, the method is flexible. You can tailor the flavor to your mood or pantry: chocolate cookies for a deeper bite, vanilla wafers for a lighter approach, or even a gluten-free swap if that suits your dietary needs. The goal is comforting, not stressful—an afternoon project you can turn into a confident culinary moment to share (or to keep as your secret weapon for a weekend treat).
Tip: document the process with photos or a quick video if you’re feeling extra ambitious. You might discover a hidden talent for culinary storytelling—and you’ll have a sweet souvenir of your very first, foolproof ice cream sandwich triumph.
What You’ll Need (Yield: a panful of happiness)
Below you’ll find ingredients organized by the three main components of the recipe: the crust (crumbs with a kiss of butter), the filling (whipped cream folded with condensed milk and reserved crumbs), and the topping crust (the remaining crumb-butter mixture). Quantities are provided in both metric and familiar U.S. measurements to make shopping and measuring easy.
- Cookies: 300 g whole cookies (about 10–12 cookies, depending on size). The cookies will be processed into fine crumbs. Save about 100 g of crumbs aside for the filling later.
- Butter: 100 g unsalted butter, melted. This binds the crumbs into a stable, sliceable crust.
- Filling base: 2 cups (480 ml) heavy cream, cold
- Vanilla: 1 teaspoon vanilla extract
- SWEETENED condensed milk: 1 standard can (14 oz / 396 g)
- Reserved cookie crumbs for folding into filling: about 100 g (the crumbs you set aside earlier)
Equipment note: you’ll need a 9×9-inch (roughly 23×23 cm) square baking pan, lined with parchment paper for easy removal. A sturdy spatula, a bowl for whipping, and an electric mixer (hand or stand) will make the filling come together in moments, but you can absolutely whisk by hand if you’re up for a little extra effort.
Optional but helpful: parchment paper with a little overhang on two sides so you can lift the slab out when it’s firm. This makes slicing into neat bars much easier, especially after a long freeze.
Flavor and texture variations are welcome here. For a chocolatey crust, use chocolate cookies; for a white chocolate twist, swap in vanilla cookies and fold in a pinch of cocoa powder to the crust for a faint chocolate aroma. If you’re dairy-free, you can attempt a coconut milk version of the filling, but keep in mind the texture may shift slightly. The base proportions can be adapted, but the method remains wonderfully forgiving.

Photograph your progress: crumble, mix, press, and freeze—then capture the moment the filling peeks through a chilled crust. Your future viral moment might be closer than you think.
Tools, Prep, and a Little Strategy
One of the simplest ways to feel confident is having a plan and the right tools. For this recipe, you’ll want to keep a few things handy before you start.
- Paring knife or offset spatula for neat trimming of any uneven edges after slicing.
- A medium to large mixing bowl for the whipped cream and folding.
- A whisk or electric mixer for the cream; if you’re using an electric mixer, keep an eye on the speed so the cream doesn’t turn to butter.
- A clean, dry spatula for folding in the reserved crumbs without deflating the whipped cream.
- A sturdy cutting board or chilled surface for slicing once the slab is frozen.
- A timer to keep track of the chilling windows—two to three hours for the filling to firm up, then at least six hours (or overnight) for the final set.
Tip: if you don’t own a food processor, you can crush the cookies by placing them in a sturdy zip-top bag and whacking them with a heavy rolling pin or a pan. The goal is fine crumbs, not powder, so you don’t need perfect uniformity. Texture matters—crunchy, sandy crumbs create the best bite when paired with the creamy filling.

Step-by-Step Assembly (No-Bake, All-Delight)
- Turn on your oven? Not required for this recipe. Instead, preheat nothing—the magic happens in the fridge and freezer. If you’re using a parchment-lined pan, have it ready so you can transfer the crust smoothly.
- Crush the cookies into fine crumbs. You want them to resemble beach-sand texture, not powder. A food processor makes quick work of this, but if you’re mashing by hand, aim for uniform crumbs with small, random bits for texture.
- Measure out about 100 g of the cookie crumbs and set them aside for the filling later. This reserved crumb will give the filling a nice crunchy interior with speckled cookie texture.
- Mix the remaining cookie crumbs with the melted butter. You’re aiming for a sandy, damp texture that can hold together when pressed. If it looks too dry, add a teaspoon more melted butter; if it’s too wet, add a tablespoon of crumbs to balance it out.
- Divide the butter-crumble mixture into two roughly equal portions. You’ll use one half for the bottom crust and the other half for the top crust later, so do your best to split evenly.
- Press one half of the butter-crumble mixture firmly into a 9×9-inch square pan that’s lined with parchment. Press steadily to create a compact, even layer about 1/4 to 1/2 inch thick. You want a stable base that won’t crumble when you lift the entire slab later.
- Wrap the pan and refrigerate for at least 15 minutes to set the crust. A quick chill helps the crust hold together when you layer the filling on top.
- While the crust chills, whip the cold cream to stiff peaks. This means it should hold its shape when you lift the whisk or beater. If you overbeat, it’ll turn grainy and buttery; underbeat and it won’t hold structure. Take it to firm but smooth peaks that stand up without bending.
- Beat in the vanilla extract until evenly distributed through the cream.
- Gently fold in the sweetened condensed milk. Do this slowly to keep the whipped texture intact—fold, don’t beat. The condensed milk adds sweetness and a creamy body that pairs perfectly with the cookie flavors.
- Fold in the reserved 100 g of cookie crumbs. This step is what gives the filling a playful texture, with bits of cookie crunch dispersed throughout the smooth filling.
- Spread the creamy filling onto the chilled crust in an even layer. Use a spatula to smooth the top and ensure the surface is as level as possible for a clean final slice.
- Freeze for 2 to 3 hours, or until the surface feels firm to the touch. This sets the filling and makes it easy to top and seal with the remaining crust mixture.
- Spread the remaining half of the butter-crumble mixture over the frozen filling. Press gently to create a seal that will keep the filling neatly enclosed as it freezes further. You’re essentially building a second crust on top—the sandwich is taking shape!
- Return the pan to the freezer for at least 6 hours, or ideally overnight. The long freeze ensures clean slices with a perfect bite from crust to creamy center.
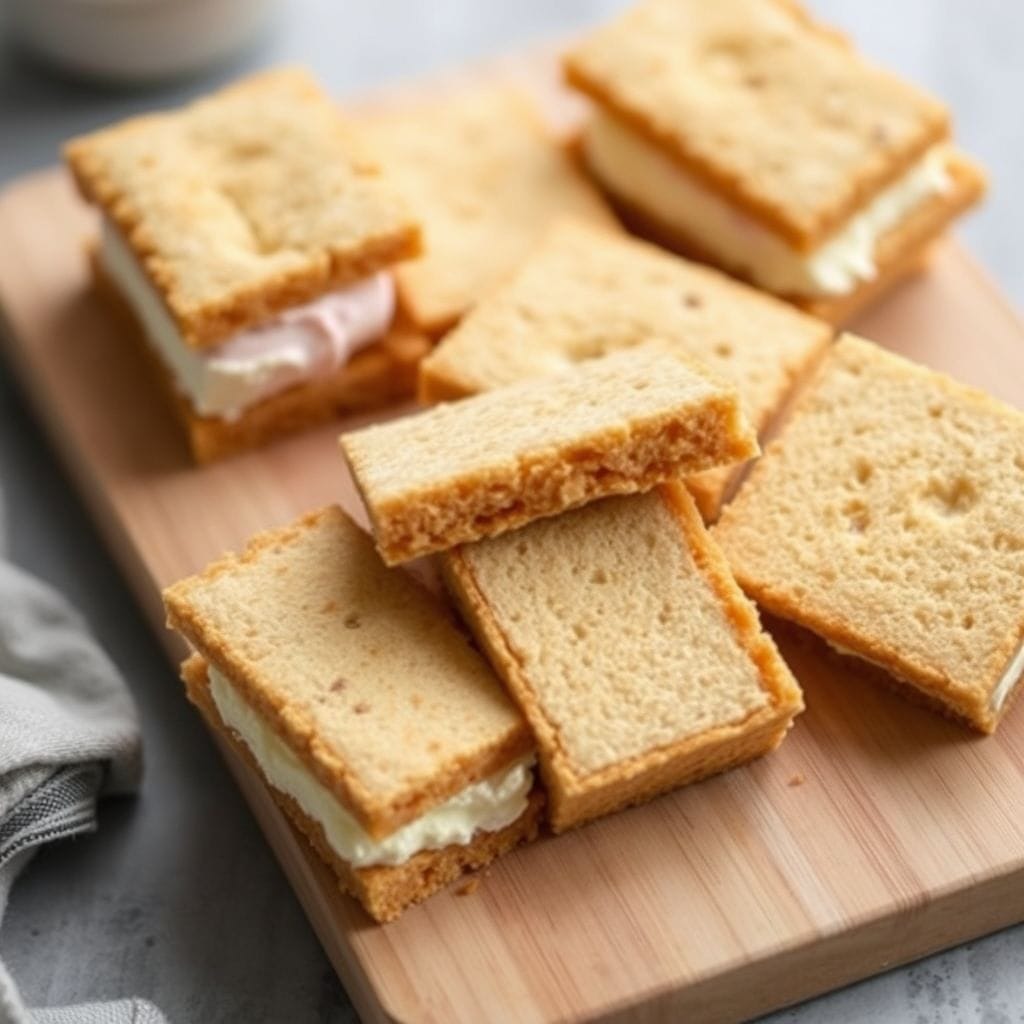
- When you’re ready to serve, lift the slab from the pan using the parchment overhang. Slice into generous squares or bars. If desired, chill briefly on the cutting board to prevent any crumbs from flaking away with the first bite.
Optional finishing flourish: for a cleaner edge, wipe your knife between cuts and re-chill the slices for a few minutes if they feel a bit soft. This keeps each bite looking willowy and neat, perfect for a photo or a plate-ready dessert.
Make-Ahead, Storage, and Serving Tips
The beauty of this no-bake ice cream sandwich is its flexibility when it comes to timing. You can prepare elements ahead of time and assemble when you’re ready to serve. Here are some practical tips to help you plan.
- Make ahead: The crust and filling can be prepared in advance. The crust (in the pan) can be kept chilled for up to 24 hours before assembly. The filling, already folded with cookie crumbs, can be refrigerated for up to a day if you want to prep in stages.
- Freezing: For best results, freeze the fully assembled slab for at least 6 hours or overnight. Freeze-wrapped slices in airtight containers or wrapped in plastic and sealed with a layer of parchment will help prevent freezer burn and maintain texture.
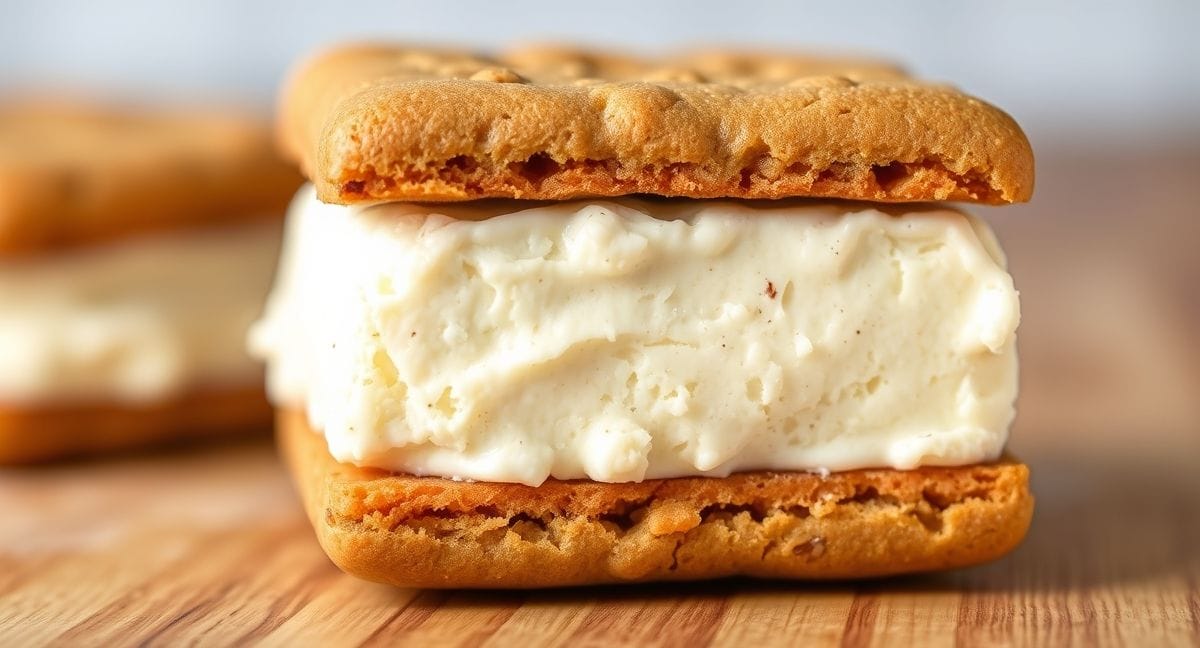
- Serving: Slice straight from the freezer for clean edges. The contrast between the crisp crust and the soft, creamy interior is the heart of the dessert. Let the slice sit for 2–3 minutes at room temperature if you like the filling a touch softer.
- Storage: Leftovers can be stored in the freezer for up to 1 month. Re-wrap to prevent drying out. If the top crust starts to crack slightly after hard freezing, a quick half-hour rest on the counter will restore the ideal bite.
Flavor Variations and Troubleshooting
If you’re feeling creative, this recipe is forgiving enough to adapt to many flavors. Here are some ideas and tips to tailor the dish to your taste or dietary needs.
- Chocolate lovers: Use chocolate cookies for both crust and filling accents. You can even swirl a ribbon of melted dark chocolate into the filling for a marbled effect (do this after folding in the crumbs for a subtle texture and sheen).
- Vanilla classic: Use vanilla wafer cookies for a lighter, sweeter profile. You can also add a pinch of sea salt to the crust for a more balanced finish.
- Peanut butter twist: Crush peanut butter cookies into the crust and fold in crushed peanut butter cups into the filling for a peanut butter-chocolate combo that’s genuinely irresistible.
- Gluten-free option: Swap conventional cookies for gluten-free alternatives with similar texture. The method stays the same; just ensure the cookies are finely crumbed for smooth incorporation into the crust.
- Non-dairy version: Use a plant-based whipped topping (bar whip) instead of dairy cream, and choose a condensed coconut milk alternative for the filling. The result will be lighter in texture, but still delicious and rich with cookie crunch.
If your filling turns out a bit loose, give it a few extra minutes in the freezer and/or chill the crust longer. If the crust isn’t holding together, add a touch more melted butter in the blending stage and mix until you reach a cohesive, sandy mass. The keys are balance and chill time—let the cold do the heavy lifting, and you’ll end up with clean slices every time.
A Gentle Note on Confidence and Joy in the Kitchen
This ice cream sandwich recipe is designed to be approachable, flexible, and forgiving. The goal is to help you move past the fear of “I can’t bake” and into a space where you can say, “I can do this—and it tastes amazing.” The crust comes together with minimal tools, the filling is a forgiving, creamy mixture, and the finishing top crust provides the satisfying seal that makes every bite cohesive and delightful.
Remember, the beauty of home cooking is that you’re writing your own culinary story. There’s no grading here, only tasting—the kind of taste that reminds you that you are capable, creative, and deserving of dessert that’s delicious and a little bit playful. So gather your ingredients, slip on your apron (optional, but encouraged), and dive into a surprisingly simple ice cream sandwich adventure that just might become your new favorite go-to dessert.
No-Bake Ice Cream Sandwich Bars
Ingredients
Equipment
Method
- Prepare Crust: Process cookies into fine crumbs. Reserve 100g for filling. Mix remaining crumbs with melted butter until sandy.
- First Layer: Press half of crumb mixture into parchment-lined 9×9 pan. Chill 15 minutes.
- Make Filling: Whip cream to stiff peaks. Fold in vanilla, then condensed milk. Gently stir in reserved cookie crumbs.
- Assemble: Spread filling over chilled crust. Freeze 2-3 hours until surface is firm.
- Top Layer: Sprinkle remaining crumb mixture over filling, pressing lightly. Freeze 6+ hours or overnight.
- Serve: Lift from pan using parchment. Cut into bars with hot knife. Enjoy immediately or store frozen.